


LaserFreak Forum
Homebuilt laser projector
Moderatoren: nohoe, lightwave, adminoli
Homebuilt laser projector
Hi 
i’m French and I’m a newbee on your forum.
(sorry for my bad English because I’m French )
I am impassioned by electronic and laser since I’m child and I wanted to build a laser projector
After i have buy some parts from a german friend ( hi Marco )
)
Theses parts are
- one multiline 100mW Argon laser
- one AOM
- a pack of dichroic and micrometric mirrors
- one Catweazzle scan engine unit
and I already have:
- a 65mW green DPSS
- one 50mW laser diode at 660nm
- LDS software with Ryia card
and now the construction
first step : found a case
i have found one old flycase at my work
after lot of cleaning i obtain this :

inside :

second step the laser reception :
the head

the power supply:

and the wire section of the power supply :

12A @ 230v wow !
and for cooling the fan :

lot of noise !!
for the head holding i have found a PVC pipe holder

and the first laser test :

and with a diffraction grating :

that’s beautiful !
and now the main work!
the aerations
the litle :

screwing the protection roast:

and after two other aerations :

showed by a friend :

i now cut the rear of the flycase to instal some electronic cards. To control the laser power and temperature.
The argon laser include a DB25 connector allowed to control and monitor the laser power
I use it by my system and tell him a analogic voltage (0 to 5v for 4 to 10A ) and I monitor the current by the feedback voltage of 0.1v/A
I have used linear isolation amplifier (iso122) to kep the electrical isolation between the laser power supply and my system.
The system control the laser discharge and cooling the head with the fan even when the laser discharge is turned off the cooling continue until the head temperature exceed 30°C
The monitor control the red laser diode peltier to trim the wavelength from 650 to 640nm
But it’s not finished
To display the informations i use a 240*64 pixels graphic LCD with built in T6963C controller and to eart of the system is a P89C668 8051 core microcontroller with built in 8Ko RAM 64Ko code, I²C UART and in situation programming with serial communication.
The parameters can be adjusted by a 16 buttons pad.
The system allow to control the security shutter, fog machine and R/G/B laser on/off
Now more pictures :
Cutting the rear panel :

the hot air fan exhaust:

and all cuttings :

after routing the PCBs fabrication...
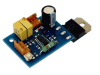
the red laser and I²C temperature sensor PCB:

Argon head holder test :

we see the rear control panel and bread board cutted by laser
i make a mistake on the dimensions but that good…
we see the security switch for the electromagnetic shutter and laser interlock
the control system PCB :

my name:

the keypad controller :

mount of the differents cards

and a front view:

i start to mount the optics

the AOM

but i not use it for the moment
a view of the green DPSS :

a view on the catweazle galvo set

inside the box just before to close it….yes ! lot of cables

The rear of the control panel

the 4 leds below the security switch are a voltage indicator because when i go in LAN game there sometimes wiring mistake and the voltage go up to 420v!! (two phases)
these four leds indicate the voltage:
the first for 110v (yellow) second (blue) 230v the third (red ) 380v and the fourth (red) 420v
and they work on rechargeable battery. In normal operation on 230v the battery is charged.
When the main supply is disconnected the leds work for 4 minutes on battery and go in idle state.
When the main supply is applied (but main switch not turned on) the led are turned on (by the 9v battery) and indicate the voltage….with this I know if the voltage is 230v or not befor turn on tne main switch.
If the voltage exceed the 230v a buzzer make a beep and the red led flashes
The first test but the microcontroller code is light :

and a test in real conditions :
the optical path :

scan engine working :

that fabulous to see them working
and a projection on a wall :

a test with laser illusions (before LDS)

and a little video
http://perso.wanadoo.fr/genesis.thequar ... r/test.avi
the only problem is the weight…that really heavy
and now some test pictures :
that was difficult to carry it on my bed


and the control display with more informations :

and another video
http://perso.wanadoo.fr/genesis.thequar ... ser/ut.avi
i have now make a test with tha AOM but it’s difficult to adjust


close view of the AOM:

in french voilà
i m here and i work to fix the AOM and electromagnetic shutter.
After I need to install the red laser and adjust the mirrors.
The program need to be improved
I’m happy to have make this child dream project and make it working.
any comment, amelioration, questions are welcome and if you want info about the electronic system ask question
genesis
ps: if the pictures are too large, i can resize them
i’m French and I’m a newbee on your forum.
(sorry for my bad English because I’m French
I am impassioned by electronic and laser since I’m child and I wanted to build a laser projector
After i have buy some parts from a german friend ( hi Marco
Theses parts are
- one multiline 100mW Argon laser
- one AOM
- a pack of dichroic and micrometric mirrors
- one Catweazzle scan engine unit
and I already have:
- a 65mW green DPSS
- one 50mW laser diode at 660nm
- LDS software with Ryia card
and now the construction
first step : found a case
i have found one old flycase at my work
after lot of cleaning i obtain this :
inside :
second step the laser reception :
the head
the power supply:
and the wire section of the power supply :
12A @ 230v wow !
and for cooling the fan :
lot of noise !!
for the head holding i have found a PVC pipe holder
and the first laser test :
and with a diffraction grating :
that’s beautiful !
and now the main work!
the aerations
the litle :
screwing the protection roast:
and after two other aerations :
showed by a friend :
i now cut the rear of the flycase to instal some electronic cards. To control the laser power and temperature.
The argon laser include a DB25 connector allowed to control and monitor the laser power
I use it by my system and tell him a analogic voltage (0 to 5v for 4 to 10A ) and I monitor the current by the feedback voltage of 0.1v/A
I have used linear isolation amplifier (iso122) to kep the electrical isolation between the laser power supply and my system.
The system control the laser discharge and cooling the head with the fan even when the laser discharge is turned off the cooling continue until the head temperature exceed 30°C
The monitor control the red laser diode peltier to trim the wavelength from 650 to 640nm
But it’s not finished
To display the informations i use a 240*64 pixels graphic LCD with built in T6963C controller and to eart of the system is a P89C668 8051 core microcontroller with built in 8Ko RAM 64Ko code, I²C UART and in situation programming with serial communication.
The parameters can be adjusted by a 16 buttons pad.
The system allow to control the security shutter, fog machine and R/G/B laser on/off
Now more pictures :
Cutting the rear panel :
the hot air fan exhaust:
and all cuttings :
after routing the PCBs fabrication...
the red laser and I²C temperature sensor PCB:
Argon head holder test :
we see the rear control panel and bread board cutted by laser
i make a mistake on the dimensions but that good…
we see the security switch for the electromagnetic shutter and laser interlock
the control system PCB :
my name
the keypad controller :
mount of the differents cards
and a front view:
i start to mount the optics
the AOM
but i not use it for the moment
a view of the green DPSS :
a view on the catweazle galvo set
inside the box just before to close it….yes ! lot of cables
The rear of the control panel
the 4 leds below the security switch are a voltage indicator because when i go in LAN game there sometimes wiring mistake and the voltage go up to 420v!! (two phases)
these four leds indicate the voltage:
the first for 110v (yellow) second (blue) 230v the third (red ) 380v and the fourth (red) 420v
and they work on rechargeable battery. In normal operation on 230v the battery is charged.
When the main supply is disconnected the leds work for 4 minutes on battery and go in idle state.
When the main supply is applied (but main switch not turned on) the led are turned on (by the 9v battery) and indicate the voltage….with this I know if the voltage is 230v or not befor turn on tne main switch.
If the voltage exceed the 230v a buzzer make a beep and the red led flashes
The first test but the microcontroller code is light :
and a test in real conditions :
the optical path :
scan engine working :
that fabulous to see them working
and a projection on a wall :
a test with laser illusions (before LDS)
and a little video
http://perso.wanadoo.fr/genesis.thequar ... r/test.avi
the only problem is the weight…that really heavy
and now some test pictures :
that was difficult to carry it on my bed
and the control display with more informations :
and another video
http://perso.wanadoo.fr/genesis.thequar ... ser/ut.avi
i have now make a test with tha AOM but it’s difficult to adjust
close view of the AOM:
in french voilà
i m here and i work to fix the AOM and electromagnetic shutter.
After I need to install the red laser and adjust the mirrors.
The program need to be improved
I’m happy to have make this child dream project and make it working.
any comment, amelioration, questions are welcome and if you want info about the electronic system ask question
genesis
ps: if the pictures are too large, i can resize them
Zuletzt geändert von genesis am Fr 23 Apr, 2004 2:12 pm, insgesamt 1-mal geändert.
-
tracky

- Beiträge: 4843
- Registriert: Di 11 Mär, 2003 1:51 pm
- Do you already have Laser-Equipment?: Hat sich im Laufe der Jahre doch einiges angesammelt
- Wohnort: Germany, Seefeld bei Werneuchen
- Kontaktdaten:
Hello genesis, only once large praise to you. Your projector makes already which ago. Looks very good. I hope you could with the instruction files for LDS something begin. Concerning your inquiry in the other Thread, because of exchanging Lasershows, I can only say, which would be at the original attached software CD already alone a quantity of good Shows thereby be over file sharing it however a rather long time to high-load these since it concerns thereby several MB data. New Shows costs money, which should be also understandable, because finally puts behind there a quantity work to program a new Show.
Gruß Sven
Laser? Was ist das? Licht aus super erschwinglichen Restbeständen
Laser? Was ist das? Licht aus super erschwinglichen Restbeständen
thanks you for your post
yes the pdf help me a lot!
but for "Your projector makes already which ago. Looks very good" i not understand. do you use a translator?
for the topic about shows, i have a lot with the LDS software but in the topic i tell about sharing home made shows, not commercial
i know theses shows are expensive
but that was just an idea to create a free lasershow database such as ilda public domain frames


i have worked on it this week
i have trimmed the lasers and AOM

the optical path:

the output:

and the box on my bed:

and show tests:
http://perso.wanadoo.fr/genesis.thequar ... /show1.avi
the aom modulation:
http://perso.wanadoo.fr/genesis.thequar ... largon.avi
but i think i can adjust it more efficiently
and a part of the "creation" laser show but without music
http://perso.wanadoo.fr/genesis.thequar ... ation2.avi
and more tests by night
http://perso.wanadoo.fr/genesis.thequar ... /show2.avi
http://perso.wanadoo.fr/genesis.thequar ... /show3.avi
that work great!! more than i espected:

all work great and i have added one more fan and electromechanical security shutter this week end....
i have trimmed the lasers and AOM
the optical path:
the output:
and the box on my bed:
and show tests:
http://perso.wanadoo.fr/genesis.thequar ... /show1.avi
the aom modulation:
http://perso.wanadoo.fr/genesis.thequar ... largon.avi
but i think i can adjust it more efficiently
and a part of the "creation" laser show but without music
http://perso.wanadoo.fr/genesis.thequar ... ation2.avi
and more tests by night
http://perso.wanadoo.fr/genesis.thequar ... /show2.avi
http://perso.wanadoo.fr/genesis.thequar ... /show3.avi
that work great!! more than i espected:
all work great and i have added one more fan and electromechanical security shutter this week end....


Hi
i make some evolutions
i have add a medialas red laser


the modulation is better with this one


and with gaze screen


diffraction grating test i love that!

some test in raster frame the wall was 30 meters away


here a video of the system running:
http://thequark.free.fr/laser/rvbtest.wmv
now i work on the microcontroller code to use icons thats better than text.
here a litle video of the icons test
http://thequark.free.fr/laser/photos/icontst.avi
to be continued....
i make some evolutions
i have add a medialas red laser


the modulation is better with this one


and with gaze screen


diffraction grating test

some test in raster frame


here a video of the system running:
http://thequark.free.fr/laser/rvbtest.wmv
now i work on the microcontroller code to use icons
here a litle video of the icons test
http://thequark.free.fr/laser/photos/icontst.avi
to be continued....
thanks
lot of work but for an amazing result
lot of work but for an amazing result
Zuletzt geändert von genesis am Fr 25 Feb, 2005 10:09 am, insgesamt 1-mal geändert.
after more coding that's better
more than before
i prefer graphic than text
a little screenshot

and startup video :
http://thequark.free.fr/laser/photos/icontst2.avi
to be continued....
more than before
i prefer graphic than text
a little screenshot

and startup video :
http://thequark.free.fr/laser/photos/icontst2.avi
to be continued....
lot of code later that's better

boot: video
http://thequark.free.fr/laser/photos/boot_ok.avi
and with diode sensor disconnected:
http://thequark.free.fr/laser/photos/boot_nok.avi
to be continued

boot: video
http://thequark.free.fr/laser/photos/boot_ok.avi
and with diode sensor disconnected:
http://thequark.free.fr/laser/photos/boot_nok.avi
to be continued
Hi all
i make more pics of the system
on a gaze screen...yes the AOM is disabled

this picture was taken for my avatar

thats me

and the beam path


theses pictures are the last taken by my camera because the sensor is really dead with the laser
here is a video of a show at a LAN party with two lasers
the mine is at the right and the left one is the Ledinblue laser
be aware this video size is 220Mo in divx 5.1 codec
on the video we se the "nothing but you" great Gento show
http://www.bbtoff.com/bbtoff/lan/game7/ ... 0game7.avi
and here is a deffect harware crash test
http://bbtoff2.free.fr/Crash%20test%20G7.avi
don't worry all is cleaned after and go to trash to be recycled
thank's to Bbtoff for theses videos

here is a picture of the laser screen with last firmware

and a video of the complete boot:

taken when i have tested my laser harp system
viewtopic.php?t=37151

and a video of the complete boot:
taken when i have tested my laser harp system
viewtopic.php?t=37151
Wer ist online?
Mitglieder in diesem Forum: 0 Mitglieder und 3 Gäste
 © Copyright 2019 LaserFreak.net